FrankenCutters Homepage
~~~~~~~~~~~~~~
Photo Galleries of some copper cutters we have made:
Single
cutters
Multiple cutters
Special cutters
Greek Letter Cutters
Dogbone cutters
Grid-cutters
Lighthouse cutters
Sets of cutters
60's Party cutters
Multiple cutters
Special cutters
Greek Letter Cutters
Dogbone cutters
Grid-cutters
Lighthouse cutters
Sets of cutters
60's Party cutters
Photo Galleries of other products we have made:
Cakepans
Cast metal stamps
Stainless steel cutters
Candle items & trays
Bracelets
Earrings
Pins made of copper
Cast metal stamps
Stainless steel cutters
Candle items & trays
Bracelets
Earrings
Pins made of copper
Useful Info:
Making Cookie Cutters
First, here are the main steps in hand-making a copper cookie cutter (at least the way I do it):
1. Using steel wool, scrub both sides of a piece of copper until it is clean and shiny (or use "secret tool #17, no picture).
2. Using the metal shear (below), cut a few strips to size, for instance, 3/4" x 15" to make a trout.
3. Bend each strip into shape, using a variety of hand-made or modified tools (see below), and/or hand made bending forms (see "angel" below).
4. Using special clamping tools, hold the ends in perfect alignment, and solder the ends together.
5. Engrave the maker's mark "FC" on each cutter. ("FC" is for "FrankenCutters".)
6. Inspect the cutter, and straighten any bends as necessary.
7. Clean and polish the cutter, especially the soldered area, using "secret tool # 34". (no picture)
8. Pack up and ship the cutter (3 block bicycle ride to the Post Office). (Update: now it's a 3 mile drive... bummer!)
Okay, now the tools:
I've always been very "into" tools,
finding, collecting,,and making them. Working with copper requires
a number of tools, some pretty unique, and here's some
description:
Soldering equipment.- I've
soldered, welded, and brazed with a lot of different tools. As the
original tinsmiths did, I wanted to do all of my work by
soldering. After a lot of experimenting with butane, propane, and
trying to build my own custom gas torches, I finally settled on
using a commercial hand-held propane torch. It works very well and
is fairly economical. Although for some types of product I still
use big 100 or 150 watt electric irons, or even a small propane
stove.
Solder - I've always used
lead-free solder, but lately have been evaluating a large number
of varieties of lead-free solder available now. There are many
different solder formulations, different fluxes, different flux
percentages, etc... very complicated. Sometimes the best solder
for making outline cuttes isn't the same as when making tiny
button cutters or big commercial cutters with backs & handles.
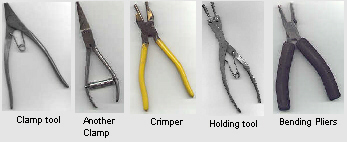
Hand Tools: Over the years,
I've really enjoyed making and modifying a variety of small tools
for bending, crimping, and clamping copper items. Here are some
examples:
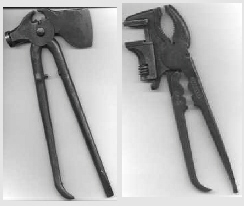
And
these two tools I do not use in making cookie cutters,
but I'm showing their pictures here because they are really old
and really cool!....
A metal shear, also called
"squaring shear", or "stomp shear" - This is the biggest tool.
After a LOT of looking around, I finally found a 1974 PEXTO 37"
shear in very good condition, painted in John Deere green &
yellow. I had to pay $900 for it, but a good tool is a good
investment. I did have to resurface the cutting blade and clean
and adjust everything, but it sure works well now.
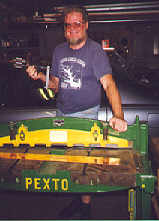
Crimping tools - In my hand in
the photo above, is a hand driven crimping tool. There are a
number of hand-driven crimping and rolling tools available. They
can be bought new today for a ton of money and the old ones,
dating from 1900 or later, can be sometimes found for only half a
ton of money. Mine is pretty ancient, and only cost $50 but the
crimping gears are very pitted an worn and took a lot of work to
clean up.
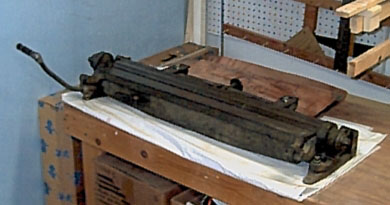
Bar
Folder - This is a surprisingly heavy, very old (maybe 75
years?) tool for folding the edge of sheet metal to make a
stronger and smoother edge. I bought this for $50 cash, no
receipt, from an old tools dealer in Grand Rapids, MI.
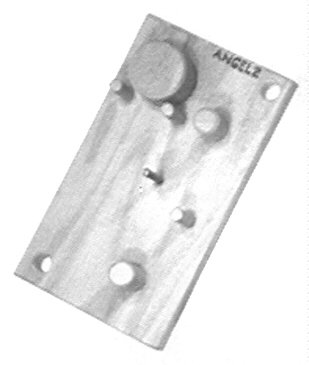
Bending Jigs: All of my
cutters are made by hand, especially all the "one of a kind" ones.
I have made a lot of "Generic" forms which help in making curves
and bends. I also have made special forms for making good, round
circles. And for some "stock" designs, I make simple wooden jigs
to facilitate making the bends. The one below is for making
Angels.
Update
on Bending Jigs:: These days, since I don't sell
"stock" cutters anymore, I have gravitated to using a smaller
number of flexible, multipurpose bending jigs. Some make
sharp bends, some make rounded curves, some make specific curves
(such as for hearts). So most of the cute "specialized"
bending jigs are packed in a few large cardboard boxes.
Hope you enjoyed a look at how I make cutters and
a few of the tools
-Frank